


[Video Transcript]
Hello! I’m RyanF9 and these are motorcycle mods under 100 bucks.
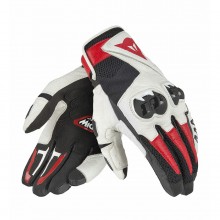
First option – swap your levers.
The obvious motivation is style. Levers are a fun way to add some colour pop .
Of course I’m not very poppy, so I went with black. But even in a boring colourway there are still benefits to an aftermarket lever.
One is adjustability. If your brakes start fading on the 20 th lap, you can reign in the free play to regain braking precision. This Puig lever has six reach settings that can be toggled on the fly.
For what it’s worth, I adjust mine quite close for ADV riding… makes two-finger clutching way easier when standing up.
The lever is also adjustable for length. This end nub can slide in and out if you loosen the allen screw . Of course nobody wants to change their lever length mid-race, just like nobody wants to pack allen keys into their leathers. But when you first install the lever, it’s nice to know that you can get that perfect length.
I think the length-adjuster winglets are more useful for crashing, anyway. Say you lowside- maybe this little nub grinds away and breaks off. Well you still have a half-functioning lever if you want to keep riding, plus you can later replace the winglet rather than install a whole new setup.
In essence, the length adjuster acts as a tiny frame slider.
And since I’ve mentioned crashing, I should also say that the Puig Extendable Folding Levers make like their name and fold . That means they’re even less likely to break when you low-side at 200mph in Le Mans.
Or when you drop your bike at 2mph in Le Driveway. No judgment.
The only question left is – why choose a Puig lever? Everyone knows CRG owns the game and while their levers do cost 50 dollars more, they also include the bike-specific adapter which Puig makes you buy separately.
Well , main reason for me is the thumb toggle. Puig makes properly chunky ones, which don’t look as sexy in the parking lot, but are way easier to find through leather gloves in the heat of a race.
Next up – a blue headlight bulb.
This is about as easy as motorcycle mods get. Relieve your wallet of 10 bucks, plug this little guy into your bike, and you’ve got a new nighttime look.
I chose the Drag Specialties Halogen Superwhite … for two reasons.
One is this bluish tint, which filters out the boring yellow of traditional lamps . The result is a brighter, crisper, whiter beam of light… kinda like the blinding HID lamps you see on luxury SUVs, only less douche-y.
The second reason is that – even though it shines like an HID – this bulb draws a very Halogen number of amps. Meaning it probably won’t cook your motorcycle’s fuse on startup, which is great, because Xenons like to do that.
So, a cheap mod that lets you see farther down the road, makes sure you get seen from further down the road, and keeps your bike looking modern further down the road .
Win-win-win.
Next we have frame sliders, and I’ve chosen the Vortex Frame Slider Kit because of Goldilocks.
See racing sliders are low – they’re less likely to catch on something and send the whole motorcycle cartwheeling down the track. On the other hand, street sliders are tall, so when you drop your bike at slow speed, they hold it higher off the ground, thereby protecting more of your fairing and handlebar from damage.
But the Vortex kit is just right . It’s reasonably tall to protect your bike at slow speed. But the replaceable pucks are also made from a soft material, so they grind away and break apart rather than torqueing your motorcycle into a flip.
And on that note, I’d like to pause for a moment in bullshit corner. Vortex calls this soft substance a “special energy-absorbing material.” Which is a great way to describe plastic if you want to sound like a pretentious pr*ck.
Anyway , sliders are bike-specific and for a lot of motorcycles , they come in cut or no-cut versions.
For the cut version, you drill through the fairing to bolt it on. And for the no-cut version, the slider uses a bracket to reach an already-exposed bolt.
Personally, I’d get the cut version. Yes the installation is more invasive, but the hole in your fairing will be hidden and it’s worth it for a stronger, more direct anchor point. Of course a lot of riders won’t have to worry about that. With streetfighters and naked bikes there’s nothing to drill through anyway.
So that’s frame sliders – an easy 80-dollar mod that might save you 800 dollars in new fairings.
In a similar vein, I’ll mention swingarm spools really quick.
20 bucks, thread them into the holes that Kawasaki or Honda or Yamaha politely drilled into your swingarm, and you’ve got an easy contact point for your rear stand. Makes chain lubes and wheel removals a lot easier.
Now you’ve probably noticed that I haven’t unwrapped my Vortex Spools, and that’s because they came in the wrong colour. Normally I wouldn’t mind a red finish but with spools you really want silver, because everything else just gets scratched to shit by your paddock stand.
Fourth cheap mod – knee grips.
Usually some kind of rubberized sticky, they do a good job of teaching you how to install these in kindergarten. Clean the surface area before you put it on, use a blow dryer when you want to take it off... it’s a sticker for pete’s sake.
But a useful one at that! If you want to hang off your bike like Marc Marquez, having some grip tape on your tank is a huge benefit. Especially if you’re wearing textile pants.
These knee pads come straight from Kawasaki and feature a cool carbon print . But of course there are lots of aftermarket alternatives and – no offence to Kawasaki – my favourite knee grips actually come from a 3 rd party called StompGrip. And lastly, it’s possible to get a fender eliminator kit for under 100 bucks.
Wowwww – ain’t that the sexiest thing you’ve ever seen.
Alright maybe not, but the alternative is much worse. Factory fenders give your motorcycle way too much junk in the trunk. Best to hack it off and tighten everything up with a fender eliminator.
This Yoshimura kit is one of the best-selling eliminators on FortNine.ca, which is why I was able to snag it from the warehouse so easily. But there’s no point singing the praises and problems on this particular unit, since you’ll have to choose whatever fits your motorcycle.
There are a few things to look out for, though. One is the license plate size – Americans run 4x7 whereas Canadians add an inch on either side of that. So whoop-dee-doo, we have better beer and prettier women and bigger license plates… all that means is we usually have to trim the edges and drill new holes.
Another thing to watch is lighting . Your fender eliminator kit should include a lamp for lighting your plate at night… otherwise you’re just buying a ticket magnet.
And finally, pay attention to what the kit requires you to re-use . In this particular case, I have a new taillight, but only a bracket for re-mounting my factory turn signals. It’s good to know about that kind of thing before “uninstalling” the old fender with a sledge hammer.
Speaking of which, removing shit is often a good way to mod your bike for free. Passenger pegs, seat and handles, extra bodywork… anything you can lose will shave weight and change the look of your bike.
And that’s it for motorcycle mods under 100 dollars… thanks for watching.